 Today
we’re starting with the Basic Pant, with an elastic casing waistband.
This is similar to a pair of comfy pajama pants or a sweat suit. But
don’t let those terms scare you! Even a pair of basic pants can look
cool and fashionable paired with other accessories.
Today
we’re starting with the Basic Pant, with an elastic casing waistband.
This is similar to a pair of comfy pajama pants or a sweat suit. But
don’t let those terms scare you! Even a pair of basic pants can look
cool and fashionable paired with other accessories. And when you’re ready to mix it up, try out our other simple pants tutorials:
But first, let’s talk about pants.
 Elastic
waist-band pants/shorts are one of the easiest things to make. I think
it was the first real project I sewed for myself as a teenager. Once you
figure it out, you will turn your nose up at similar pants in the
store, realizing that they are ripping you off at those prices! You just
need to understand how pants are put together. And then it’s like
riding a bike….you will never forget.
Elastic
waist-band pants/shorts are one of the easiest things to make. I think
it was the first real project I sewed for myself as a teenager. Once you
figure it out, you will turn your nose up at similar pants in the
store, realizing that they are ripping you off at those prices! You just
need to understand how pants are put together. And then it’s like
riding a bike….you will never forget.Pants are made of 4 pieces (2 different pattern pieces). The best way to understand this is to study your own pair of pants and see how they’re put together; maybe even cut up a junk pair of pants. I have been making basic pants for my son since he was born. My pattern keeps growing and adjusting (since he seems to grow up and not out). It’s easy to make your own pattern, using our pattern drafting tutorial HERE, or you can download our Kid Pants pattern later in the tutorial.
 If
you’ve never made pants before and you’re drafting your own pattern
(from an existing pair of pants), you may want to sew a trial pair
first….just to see if you’re creating the pattern properly. You don’t
have to sew this trial pair all the way to the end (unless they’re
adorable of course) but this will allow you to make changes to your
pattern before cutting into your nice fabric.
If
you’ve never made pants before and you’re drafting your own pattern
(from an existing pair of pants), you may want to sew a trial pair
first….just to see if you’re creating the pattern properly. You don’t
have to sew this trial pair all the way to the end (unless they’re
adorable of course) but this will allow you to make changes to your
pattern before cutting into your nice fabric.And that’s all you need to understand about pants. Let’s get cutting and sewing!


 First, you need a pattern.
You can create your pattern using our Tutorial HERE.
OR….
Download and print off our pdf pattern HERE! It’s a size 2T-3T (appx 2 years old to 3 or 3 1/2 years old) and uses about 1/2 to 1 yard of fabric.
THE PATTERN SHOULD BE PRINTED IN “LANDSCAPE” FORMAT
* You’ll automatically be prompted to open the 1-page pdf in Preview
* Save and/or print the doc to your home printer
What I love about this pattern:
* Style and comfort. There are many patterns out there that use the same pattern piece for the front and back legs. It’s a simple way to sew pants. However, these types of pants often look bulky and less tailored to me. The pattern I’ve drafted has a slightly larger crotch on the back piece (to accommodate booty). But they’re still just as easy to sew! And the best part is the waistline! It’s cut lower in the front so the waistline isn’t gouging into a baby belly and overall, the pants look more flattering.
* Added length. The legs on these pants are extra long, giving you more options with the hem. If you sew a very wide hem on these, you can let the hem down as your child grows so the pants last even longer.
 Pattern NOTE 1:
My son is a skinny 3 year old and these pants fit him perfectly, with
underwear or with a disposable diaper, and there’s a little room for him
to grow. If your child uses cloth diapers or is a bit heftier, you’ll
need to make adjustments by expanding the waist and legs. If you’d like
to make a smaller size, slim down all around on the pattern and with a
bit of trial/error, you should be good!
Pattern NOTE 1:
My son is a skinny 3 year old and these pants fit him perfectly, with
underwear or with a disposable diaper, and there’s a little room for him
to grow. If your child uses cloth diapers or is a bit heftier, you’ll
need to make adjustments by expanding the waist and legs. If you’d like
to make a smaller size, slim down all around on the pattern and with a
bit of trial/error, you should be good!Pattern NOTE 2: There is a dotted line on the pattern labeled “Flat Front”. This is to make flat front pants, explained HERE in the step-by-step tutorial.
Pattern NOTE 3: This pattern is not for commercial use or monetary gain. I don’t mind if you use my instructions to aid in your own pants-making for a small shop, but please draft your own pattern when making these for profit.
Print and Pattern Prep:
- Print the pattern from your computer. PRINT IN LANDSCAPE setting (horizontal). There are 6 pages total–3 pages for the Front of the pants and 3 pages for the Back of the pants. Each page will fill on an entire 8 1/2 x 11, standard sheet of paper. If your paper standard is a different size, the images may be slightly off but you should be able to make out the image fairly well.
- Line up the pattern pages together–matching up the arrows and letters with each other. Do NOT overlap pages. Just butt them right up next to each other and tape them together. And you’re done! Pattern is ready to go!
Let’s talk about fabrics.
I’ve made these pants from all types of cotton and linen. For this pair I used a black/white cotton seersucker–one of my favorite fabrics of all time. Seersucker breathes well, drapes well, looks darling on kids, and just screams summer.
 Fabrics to use (* appx 1/2 to 1 yard of fabric, depending on the size):
Cotton – all types
Linen
Seersucker (pictured above)
Stripes/plaids
Knits
Corduroy
Chambray
Lightweight denim
* Print off the pattern first, make any adjustments for your child’s size, and you’ll know how much fabric is needed. I used a 1/2 yard for this pair.
Okay, with your pattern printed, taped, and cut…
Fold your fabric in half and lay out the pattern. You don’t need to cut anything “on the fold” but you do need TWO Front pieces and TWO Back pieces. Make sure your fabric is folded with the right or wrong sides of your fabric together so that you end up with two Backs that are opposites…the crotches facing in opposite directions.
Trace your pattern to the fabric using a fabric pen or marker.
And cut out the pattern pieces from your fabric.
 There
are various methods for sewing pants. This is the easiest method for my
hands and brain, and the way I sew pants (almost) every time.
There
are various methods for sewing pants. This is the easiest method for my
hands and brain, and the way I sew pants (almost) every time.Since your front and back pieces are already together, start by sewing down both of the crotches. If your fabric has a Right side to it (mine does not–both sides of my fabric look the same), make sure you flip the pieces before sewing so that the Right sides of the fabric are facing each other.
 Using a 3/8 inch seam allowance,
start at the waist and sew to the end of the crotch (or vice versa;
doesn’t matter). Do this for both front pieces and both back pieces.
Using a 3/8 inch seam allowance,
start at the waist and sew to the end of the crotch (or vice versa;
doesn’t matter). Do this for both front pieces and both back pieces.Serge off the seams (to keep it from fraying over time) and iron out the seams.
* If you don’t have a serger….do a zigzag stitch or leave the seam raw
* Always, always iron your seams. It will make your clothing look more professional and less homemade.
 The front and back of your pants should look like this:
 With Right sides of the fabric together, pin the Front and Back pieces together
on the In-seam of the legs and sew them together. Start at the bottom
of one leg and sew all the way up to the crotch and back down the other
leg, in one continuous seam.
With Right sides of the fabric together, pin the Front and Back pieces together
on the In-seam of the legs and sew them together. Start at the bottom
of one leg and sew all the way up to the crotch and back down the other
leg, in one continuous seam.Serge off and iron out your seam.

 They’re already looking like pants! Easy, right?
 With right sides of the fabric together, pin together the outside legs of the pants.
 If
you have a small side tag, add it to the outside seam, a few inches
from the bottom of the leg. And sew down both sides of the pants.
If
you have a small side tag, add it to the outside seam, a few inches
from the bottom of the leg. And sew down both sides of the pants. Serge off and iron out your seams.
 Let’s make the waistband.
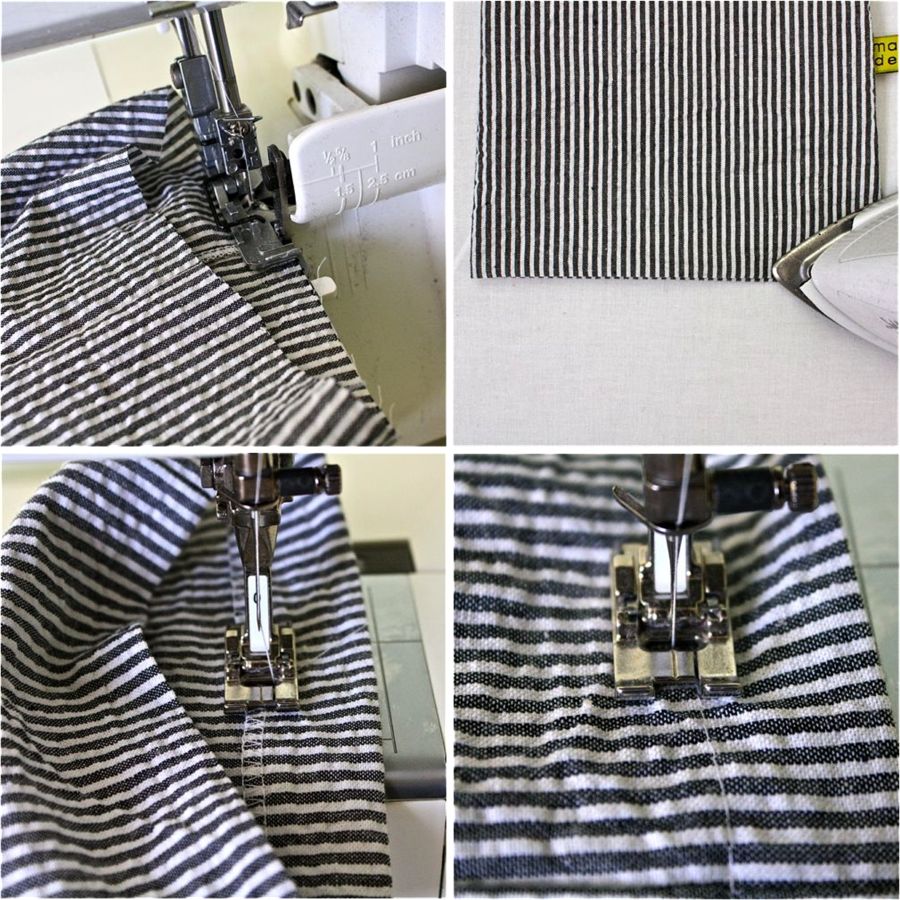
Serge all the way around the waist to finish off the edge and prevent it from fraying over time. If you don’t have a serger, iron the waistband under 1/4 inch, or finish it off with a zigzag stitch.
 It
should look like this. Notice how the front of the pants in a couple
inches shorter. This makes the pants more comfortable and well-fitted.
It
should look like this. Notice how the front of the pants in a couple
inches shorter. This makes the pants more comfortable and well-fitted. Elastic.
I prefer a wider waistband on my kid’s pants so I always use 1-inch wide elastic. But 1/2 or 3/4 inch work well too.
Measure around your child’s waist to determine the length of the elastic, and then add 1 inch to that–for overlap and sewing. My son’s waist is 19 inches, so I cut 20 inches of elastic.
 Iron
the waistband down to create a casing for the elastic. Use the elastic
to measure how wide the band needs to be–it should be about 1/4 inch
wider on the top and bottom than the elastic.
Iron
the waistband down to create a casing for the elastic. Use the elastic
to measure how wide the band needs to be–it should be about 1/4 inch
wider on the top and bottom than the elastic.Mark a start and stop point on your waistband with pins–this is where the elastic will go in and out.
Start at one point and sew all the way around to the other point to make a casing.
 Don’t
worry if you get any gathers or folds in the waistband. This may
happen, due to the pattern and the way the waistband slopes down in
front. But no worries! The waist is going to be gathered with elastic
and no one will ever notice!
Don’t
worry if you get any gathers or folds in the waistband. This may
happen, due to the pattern and the way the waistband slopes down in
front. But no worries! The waist is going to be gathered with elastic
and no one will ever notice! If you’re really concerned though, you can try smoothing the glitches out with a fingernail.
 Time to insert the elastic.
Attach a safety pin or Bodkin to one end of the elastic. Insert the elastic into the waistband casing and use another safety pin to attach it to the other end of the pants opening–so the elastic isn’t lost inside the pants.
Feed the elastic all the way through till it comes out the other end.
 Before
sewing the elastic together, safety pin the two ends together and try
the pants on your child to see if adjustments need to be made.
Before
sewing the elastic together, safety pin the two ends together and try
the pants on your child to see if adjustments need to be made. If
all is well, overlap the elastic ends by 1 inch and sew them together. I
use a tight zigzag stitch and sew in a couple of spots.
If
all is well, overlap the elastic ends by 1 inch and sew them together. I
use a tight zigzag stitch and sew in a couple of spots. * If you’ve sew the elastic and the pants are too big, cut the elastic, cut out a small bit of the elastic–about 1 inch– and resew the ends together.
* If you’ve sewn the elastic and the pants are too small, cut the elastic, and sew in another small piece of elastic, adding more length to your waist.
Sew the casing closed by pulling the waistband taut and sewing off the opening. If you have a clothing label (info on my labels here), add one to the back or inside of the waistband (before sewing the waistband closed)
 One final step!–hemming the pants.
Try the pants on your child to determine the hem length. Or, use a pair of existing pants to measure the length.
 If you make a wide hem, you’ll be able to let down the hem as your child grows taller.
Serge around the bottom of each pant leg to finish off the edge and keep it from fraying over time. If you don’t have a serger, do a zigzag stitch or iron the edge under 1/4 of an inch.
Iron the hem under to your desired length.
Sew the hem in place, sewing on the inside of the hem to make sure you catch the entire hem.
For decorative aesthetic, sew a second line on the outside of the hem, about 1/4 over from the first hemline.
 And…..you’re done!
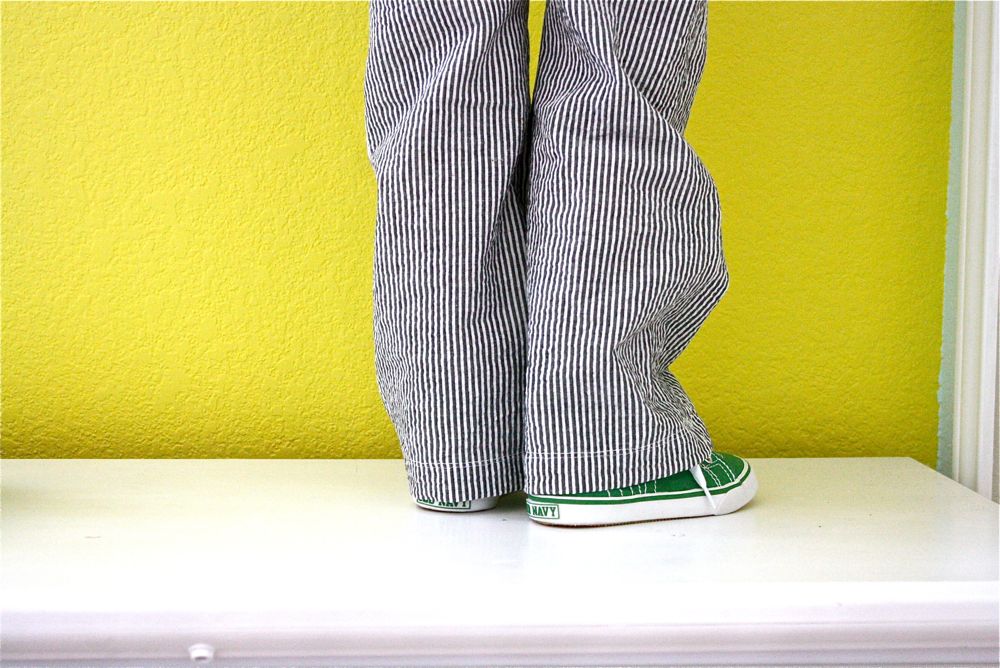
 Try them on!
 Make a few phonecalls,
 Pretend you’re in a boy band,
 and enjoy your cool comfy pants!
 Then make a few more pairs.
This pattern is so easy and fun, you might become addicted. Use the pattern to make baby gifts, for pjs, for church pants, for yourself!
And try out our other KID PANTS variations:
Tidak ada komentar:
Posting Komentar